
How to Use Single-Line Fonts in Cricut Design Space
July 6, 2026 · Updated July 11, 2026
Using a single line font in Cricut Design Space comes down to four settings: install the font, switch the font filter to System, set the Operation to Draw / Pen, and Attach the text. Get those four right and your Cricut writes like a careful human hand instead of tracing hollow outlines. This guide walks through each step in order, plus the pens and clamps, the script-font welding trick, the mobile app, foil, and every small gotcha that trips people up the first time.
TL;DR: the whole flow in one table
If you have done this before and just need the sequence, here it is. Each "why it matters" is the reason people skip it and end up frustrated.
| Step | What to do | Why it matters |
|---|---|---|
| 1. Install the font | Double-click the .otf/.ttf, click Install | Design Space uses your computer's installed fonts |
| 2. Restart Design Space | Fully close and reopen it | Fonts load only at startup, not on the fly |
| 3. Open the System tab | Switch the font filter from Cricut to System | Installed fonts live under System, not Cricut |
| 4. Type your text | Add a Text box, type your words | |
| 5. Operation to Draw | Change Basic Cut to Draw, pick a pen color | Tells the machine to write, not cut |
| 6. Attach | Select the text plus its base shape, click Attach | Holds your layout in place on the mat |
| 7. Make It | Confirm the mat preview matches your design | Last chance to catch a silent reset |
| 8. Load the pen | Pen in Clamp A until it clicks | Clamp B holds the blade |
Before you start: get a true single line font
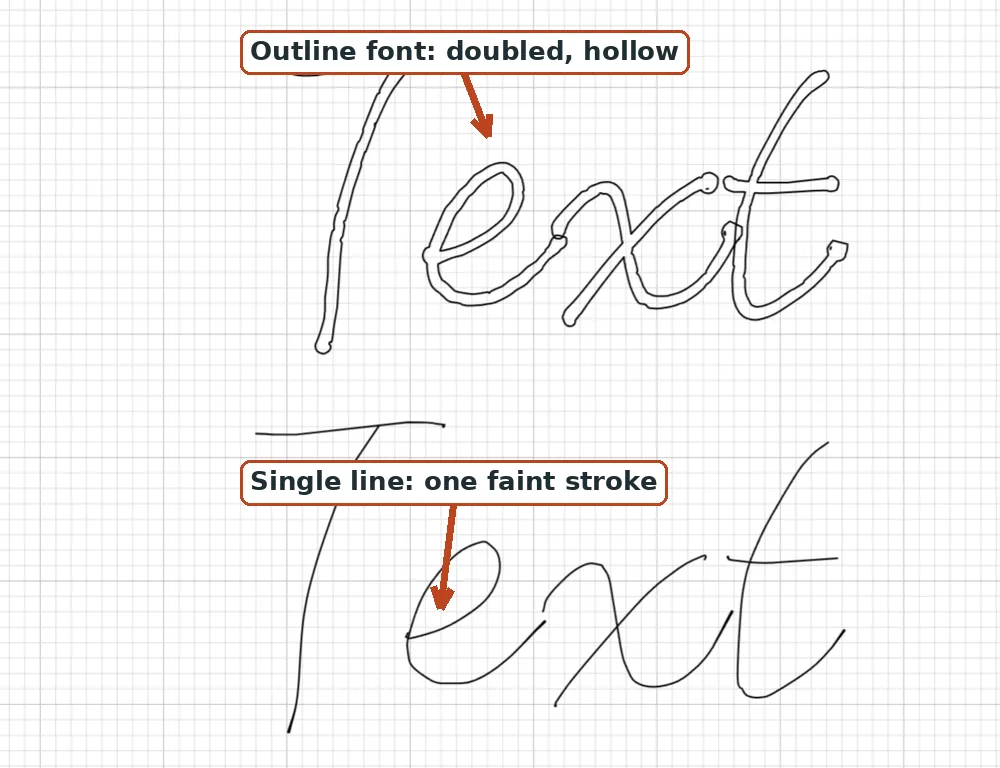
Design Space cannot turn a normal font into a writing font. The font file itself has to be single line, meaning each letter is drawn as one centerline stroke rather than a filled outline. If you set a regular font to Draw, the pen traces around every letter and you get hollow bubble writing. That one distinction is the whole reason this topic exists, and the bubble-letters guide shows exactly what goes wrong.
If you have not picked a font yet, you have three easy paths:
- Our free single line fonts are ready-made handwriting fonts with true single-line weights, free to download with no account.
- The font to single line converter turns any OTF or TTF you already own into a real centerline version that keeps the original spacing.
- The handwriting font generator builds one from your own writing, and hands you a standard font plus a matching single-line file.
New to the whole idea? What is a single line font? explains it in about two minutes, and fonts that write, not cut covers how to tell a real one from a lookalike.
Step 1: install the font and restart Design Space
- Double-click the downloaded .otf or .ttf and click Install (on Mac, Install Font).
- Completely close Design Space and reopen it. Not minimize, close.
Design Space reads your computer's fonts only when it launches. Skipping the restart is the single most common reason people say "my font is not showing up." If you installed the font while Design Space was open, it simply will not see it until the next start.

Step 2: find it under the System tab
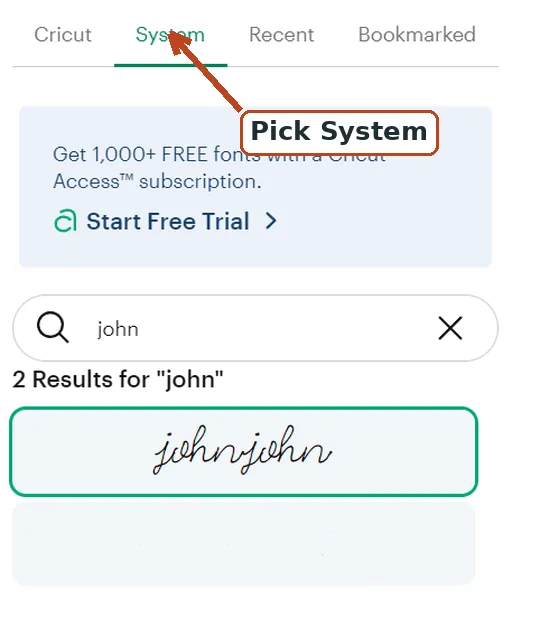
Add a Text box and type your words. Open the font menu and switch the filter tab from Cricut to System, then search your font's name.
Here is where a lot of beginners get stuck. The Cricut tab shows only Cricut's own fonts, and many of those require a paid Cricut Access subscription. Anything you install yourself lives under the System tab and is free to use. There is also an All view that mixes both, which is why your font can feel buried. Go straight to System and search by name.
Do not worry if the text looks hairline-thin or almost invisible on the canvas. A single line font has no fill, so the screen has almost nothing to shade until a pen lays down real ink. This is expected, not a bug. At the file level, OTF and TTF fonts store closed, filled shapes, so a genuine single-line font is drawn as an extremely thin closed outline that reads as one stroke. That is precisely why it looks like a hairline; the full reason lives in what is a single line font.
Step 3: set the Operation to Draw
With the text selected, open the Operation dropdown (top left, once called Linetype) and change Basic Cut to Draw. A pen-color swatch appears; pick the color you plan to load so the on-screen preview matches your real pen. This tells the machine to hold a pen path over the letters instead of cutting them out.
You will see a long Operation list: Cut, Draw, Score, Engrave, Deboss, Foil, and more, depending on which machine you selected. For writing with a pen, Draw is the one you want. The others come into play for scoring, engraving, and foil, which we cover below.
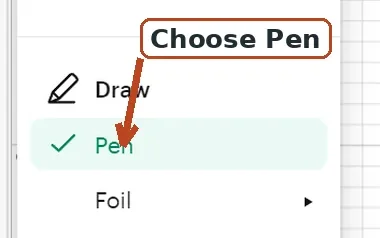
About the "set Style to Writing" advice you may have read: that step applies only to Cricut's own writing fonts, which have a Writing style built into the font. A true single-line font you installed is already single-stroke, so it will usually not offer a Writing style at all, and it does not need one. For your System font, setting the Operation to Draw is the whole job. Chasing a Writing style that is not there is wasted effort.
One quiet warning: two everyday actions silently reset this setting back to Basic Cut. Deleting and retyping the text box does it, and so does duplicating an element from an old project. Glance at the Operation indicator in the Layers panel before you press Make It.
Step 4: Attach, always
Select the text and the shape it sits on (the card base, the tag, the label) and click Attach in the Layers panel. Without Attach, Design Space rearranges your pieces to save material, and your carefully centered greeting writes itself in the corner of the mat instead of on the card.
Attach keeps a Draw layer as a draw layer, positioned exactly where you placed it on the cut layer. If your text stands alone (an envelope already loaded on the mat, for example), you can skip Attach, but position it carefully in the mat preview first.
Attach vs Weld: the script-font trick
Attach and Weld sound interchangeable and are not. Here is the difference, and the safe way to fix a heavy script join.
| Action | What it does | Use it for writing when |
|---|---|---|
| Attach | Locks layers in place; keeps a Draw layer as Draw on its cut layer | Always, to hold text on its base shape |
| Weld | Merges overlapping shapes into one path, and is destructive | Only to fix a doubled script join, on a copy |
| Group | Bundles layers so you can move them together, nothing merges | You want to reposition pieces but keep them editable |
Connected script fonts overlap where letters join. With a real single-line font this usually looks fine drawn as-is, since the strokes simply cross like real handwriting. But if a join looks doubled or too heavy in the preview and you want one continuous line, here is the safe sequence:
- Duplicate the word so you keep an editable original.
- Select the copy and Weld it (text to text) so the overlapping paths merge into one.
- Attach the welded word to your base shape.
Never weld the text directly to the base shape, or the whole thing becomes a cut. And weld a copy, because welding is destructive: once welded you cannot retype the word. Honestly, most true single-line scripts never need this, so treat it as an optional fix, not a required step.
Load the pen and go
Click Make It, confirm the mat preview shows your layout, and load your pen. Which clamp depends on your machine.
| Machine | Pen goes in | Blade stays in |
|---|---|---|
| Cricut Explore (all) | Clamp A, the accessory clamp, press until it clicks | Clamp B |
| Cricut Maker / Maker 3 | Clamp A, the accessory clamp, press until it clicks | Clamp B |
| Cricut Joy / Joy Xtra | The single clamp, drop the pen in until it seats (no click) | Same clamp, swap tools as prompted |
On Explore and Maker, open Clamp A (on the left), drop the pen in, and press down until it clicks. The blade lives in Clamp B and stays put. On a Joy there is only one clamp, so you just seat the pen; there is no click to listen for. Load your material, press Go, and let it write.
Pen tip sizes: which one for the job
Cricut pens come in a handful of tip widths, and the right one depends on how small your text is and how dark your paper is. These sizes are the evergreen part; the exact product names and colors change over time, so match by tip width.
| Pen tip | Size | Best for |
|---|---|---|
| Extra Fine Point | 0.3 mm | Tiny text, fine detail, precise envelopes |
| Fine Point | 0.4 mm | Everyday writing, addresses, cards |
| Glitter Gel | 0.8 mm | Sparkle accents and short headlines |
| Gel / Marker (medium) | 1.0 mm | Bold lines, writing on dark cardstock |
For addressing envelopes and small cards, reach for a fine 0.3 or 0.4 mm tip. When you need writing to show up on dark or textured cardstock, a 1.0 mm gel or opaque pen carries far more ink. Our full walkthrough of pen projects lives in how to write with a Cricut pen, and if envelopes are your goal, address envelopes with Cricut and wedding envelope addressing turn one address or a whole CSV into machine-sized, single-line addressed envelopes.
Beyond pens: foil and engraving with single line fonts
Single-line fonts are not just for ink. Two other jobs love them.
Cricut Foil Transfer System. Instead of Draw, set the Operation to Foil and choose Fine, Medium, or Bold (the tips are marked with one, two, or three lines). The foil housing goes in Clamp B, you tape a foil sheet over your material, and the tool applies pressure to lay down foil (no heat). Design Space prompts you to swap tips between passes when a design uses more than one weight. Single-line fonts foil cleanly because there is one path to follow rather than an outline to fill.
We R Memory Keepers Foil Quill. This is a different product: a heated pen that goes in the pen clamp and is driven as a Draw / Pen layer, not the Foil operation. Both tools do their best work with single-line designs, but do not confuse the two setups. For fonts suited to this tool, see foil quill fonts and best fonts for foil quill.
If you engrave, the same single-line files drive an engraving tip in one clean pass; single line fonts for engraving covers that path. And plotter folks can tidy up long jobs with the SVG reorder optimizer and browse pen plotter fonts.
Using single line fonts in the Cricut mobile app
You can absolutely write from the iOS or Android app. The steps map over, they just live in different spots:
- Tap your text to select it, open the edit controls, and change the layer's Operation to Draw.
- Select the text and its base shape, then find Attach under the Actions menu at the bottom.
- Tap Make It and continue as usual.
The real catch is installing fonts. Getting custom System fonts onto a phone or tablet is limited by the operating system and is not reliable across every device, so most people install their fonts on a desktop and let them sync into the app's System list. The mobile apps can also lag the desktop on a few editing features, so involved layouts are easier to build on a computer. If the app is your main tool, do the font install on a computer first, then design on the go.
Troubleshooting
- Font missing from the list? Fully restart Design Space again, and confirm you are on the System tab, not Cricut or All.
- Letters come out hollow or doubled? It is an outline font, not a true single-line one. Run the zoom test in what is a single line font and switch to a real single-line font.
- Writing in the wrong place on the mat? You skipped Attach. Select the text plus its base shape and Attach them.
- Preview shows cut lines instead of draw lines? The Operation reverted to Basic Cut (usually after a retype or a duplicate). Set it back to Draw before Make It.
- Text looks faint or invisible on the canvas? That is normal for single-line fonts, which have no fill. The pen will show real ink.
- Faint or skipping ink on paper? Seat the pen fully until it clicks, and test on scrap first; some papers drink ink faster than others.
- Not sure it is really single line? Zoom way in. One line down the middle of each stroke is good; two lines outlining a hollow shape means it is an outline font.
Frequently asked questions
Why isn't my downloaded font showing up in Cricut Design Space?
Install the .otf or .ttf on your computer, then fully close and reopen Design Space. It reads your system fonts only at startup, and installed fonts appear under the System tab of the font menu, not the Cricut tab.
Do I have to set the Style to Writing for a single line font?
No. The Style-to-Writing step is only for Cricut's own writing fonts. A true single-line font you installed is already single-stroke, so you just set the Operation to Draw, and there is usually no Writing style option to find for a System font.
Why does my writing font come out as hollow bubble letters?
It is a regular outline font, so the pen traces around each letter instead of down the middle. Switch to a true single-line font, which is drawn as one centerline stroke. The bubble-letters guide shows the fix.
Which clamp does the Cricut pen go in?
On Explore and Maker, the pen goes in Clamp A, the accessory clamp, pressed until it clicks; the blade stays in Clamp B. On a Cricut Joy there is a single clamp, so you drop the pen in until it seats, with no click.
Do I need to Weld a script single line font?
Usually no. Only weld a copy of the word if a join looks doubled or too heavy in the preview. Welding is destructive, so weld a copy, keep an editable original, and Attach the welded word to your base rather than welding it to the base shape.
What pen tip size is best for addressing envelopes?
A fine tip, 0.3 mm or 0.4 mm, gives neat small lettering on envelopes and cards. Step up to a 1.0 mm gel or opaque pen when you need bold lines or writing on dark cardstock.
Can I use single line fonts with the Cricut Foil Transfer System?
Yes. Set the Operation to Foil and choose Fine, Medium, or Bold. The foil housing goes in Clamp B and presses foil onto the material, so single-line fonts foil cleanly in one pass. Just remember the heated Foil Quill is a separate tool that runs as a Draw layer instead.
The whole flow, one breath
Install, restart, System tab, type, Operation to Draw, Attach, pen in Clamp A, Go. After the first project it is muscle memory, and every writing project after that is really just typing. When you are ready for more fonts, our free single line fonts and the single line fonts for Cricut collection are the fastest place to start, and if you want writing in your own hand, the handwriting font generator will make it for you.
Try it while you're here
Your words in real fonts made from real handwriting with this tool.
Loading fonts…
Grab a true single line font and your Cricut writes like a careful hand.
Get single line fonts for CricutFree to try, no account needed. Pay only when you keep a font.