
How to Write With a Cricut Pen (Step by Step)
June 30, 2026 · Updated July 11, 2026
Writing with a Cricut pen turns your machine into a tireless hand-letterer: cards, envelopes, gift tags, and place cards that look penned by a person, no fancy handwriting needed. The setup takes five minutes, and there is exactly one thing that separates beautiful writing from hollow bubble letters. Here is the whole guide, step by step, plus quick-reference tables, project ideas, and the fixes for every way it goes sideways.
The 60-second version
Type your text, choose a single line font, set the Operation to Pen / Draw (and, for a Cricut-brand font, set the Style dropdown to Writing), Attach the text to its card or shape, load the pen until it clicks, and press Go. The font choice does the heavy lifting; everything else is ordinary Cricut workflow. If your letters come out hollow, you picked a font that outlines instead of one that writes. That is the whole story, and the rest of this page unpacks it.
What you need
- A Cricut that holds a pen
- A Cricut pen, or a third-party adapter that fits your favorite pens
- Cardstock, an envelope, or whatever you are writing on
- Cricut Design Space on your computer or phone
No special mats or blades. On an Explore, Maker, or Venture the pen rides in Clamp A, the accessory clamp where the scoring stylus goes, while the blade stays in Clamp B. On a Joy or Joy Xtra there is a single clamp, and the pen drops straight in with no adapter.
Which Cricut machines can write
Nearly the whole lineup can hold a pen. The catch is that pens are keyed to the machine family, so a pen has to seat firmly in its holder. A loose, half-seated pen can slip upward mid-project and draw faint lines or nothing at all.
| Machine | Pen clamp | Adapter | Pen label to buy |
|---|---|---|---|
| Explore family | Clamp A | None, inserts directly | Explore / Maker |
| Maker family | Clamp A | None, inserts directly | Explore / Maker / Venture |
| Joy | Single clamp | None, inserts directly | Cricut Joy |
| Joy Xtra | Single clamp | None, inserts directly | Joy / Joy Xtra |
| Venture | Clamp A | None, inserts directly | Explore / Maker / Venture |
The important split: pens labeled for Explore, Maker, or Venture are a different length and fit than pens labeled for Cricut Joy. Joy and Joy Xtra pens are shorter. Buy the label that matches your machine and you will not fight the fit.
Genuine Cricut pens vs your own pens
Cricut-brand pens are the plug-and-click option, and they come in families: Fine Point, Extra Fine Point, Gel, Glitter Gel, Metallic, Calligraphy, Washable Fabric, and Infusible Ink. One caveat worth knowing up front: Infusible Ink pens and markers are not for paper cards. They draw a design that only becomes permanent after you heat-press it onto a compatible blank, so keep them for shirts and coasters, not envelopes.
If you would rather use the pens already in your drawer, a third-party pen adapter clamps a non-Cricut pen at the right height. Makers sell these to fit Sharpie, Pilot, BIC, Micron, and gel pens, and there are even adapters that let a Joy pen ride in an Explore or Maker and the reverse.
| Option | Pros | Cons | Warranty |
|---|---|---|---|
| Cricut-brand pens | Click in, tuned colors, no guesswork | Cost more, smaller color range | Fully supported |
| Adapter + your own pens | Use Sharpie, Pilot, gel, Micron; huge color range | Fit is fiddlier, line quality varies, test first | Cricut has said non-Cricut accessories can void the warranty |
There is no single right answer here. Cricut pens are the low-effort path; an adapter is the frugal, colorful path if you do not mind testing on scrap.
Pick the right tip size
Match the tip to the size of your text and the lines stay crisp instead of blobby. Cricut tips run from hair-fine to bold marker.
| Tip size | Cricut pen type | Best for |
|---|---|---|
| 0.3 mm | Extra Fine Point | Tiny text, fine detail |
| 0.4 mm | Fine Point | Envelope addresses, cards, everyday writing |
| 0.8 mm | Glitter Gel | Accents and sparkle |
| 1.0 mm | Medium marker or Gel | Headlines and filling large letters |
For most writing, a 0.4 mm fine point is the default. Reach for a 1.0 mm marker only when the letters are big enough to carry the weight.
Set up the text in Design Space
- Open Design Space and start a New Project.
- Click Text in the left toolbar and type your words.
- Pick a single line font. This is the key step, explained in the next section, and it is the difference between writing and bubbles.
- With the text selected, open the Operation menu at the top left and change it from Basic Cut to Pen / Draw. Choose your pen color so the on-screen preview matches.
- For a Cricut-brand font, set the Style dropdown (just right of the font name) to Writing. This is the half-step most beginners miss.
- If your text sits on a card or shape, select both and click Attach, so the writing stays exactly where you placed it.
- Click Make It, load the pen in Clamp A (or the single clamp on a Joy) and push until it clicks, load your material, and press Go.
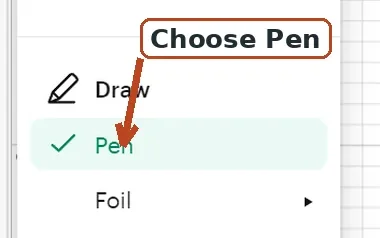
A quick note on steps 4 and 5, because they trip people up. Operation set to Pen / Draw tells the machine to draw with a pen instead of cutting. But for a Cricut font, Operation alone is not enough: if the Style is still on Regular, the machine traces the font's outline into hollow bubble letters. Setting Style to Writing is what tells that font to write as strokes. Operation is the tool; Style is the shape of the letter. You want both.
The setting everyone misses: the font itself
Here is the thing the manual glosses over. Normal fonts are outlines: each letter is a filled shape, built for printing and cutting. Ask a pen to draw one and it traces around the edge of each letter, leaving the middle empty. That is why first-time pen projects come out as hollow donut letters.
The fix is a single line font, also called a writing or sketch font. Each letter is stored as one stroke, the path a hand would take, so the pen writes instead of outlining. If your current project is already mid-bubble, Why is my Cricut writing in bubble letters? has the rescue steps, and What is a single line font? has the plain-English background.
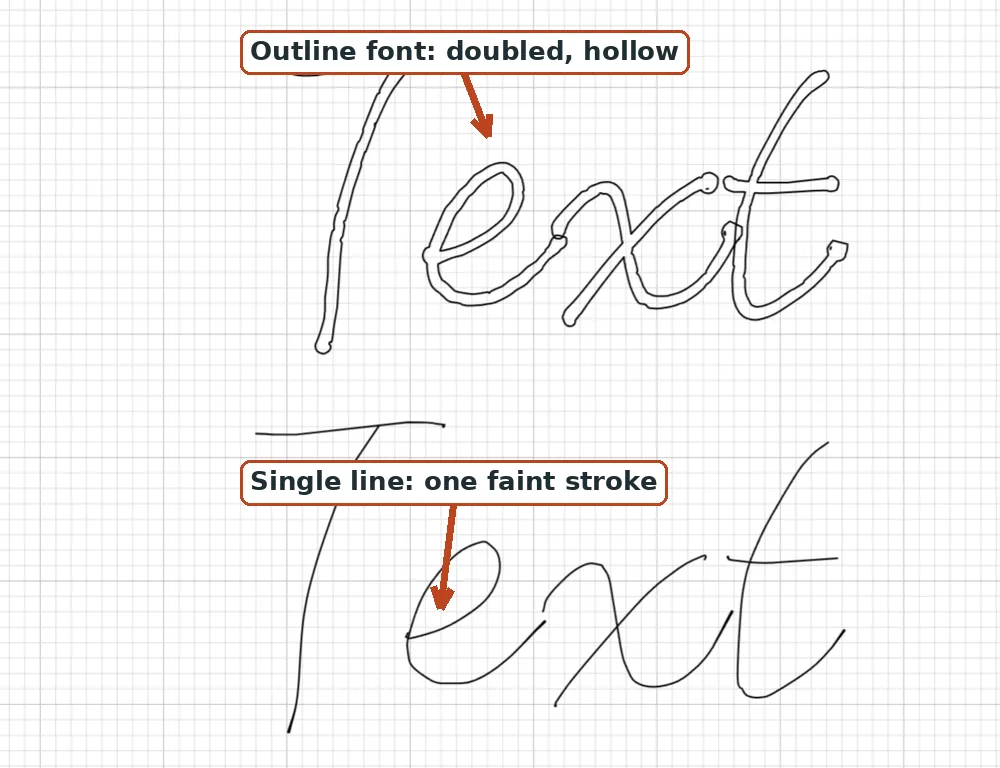
One honest warning. Design Space lets you filter for writing fonts (open the font panel, click the filter icon, check Writing), and Cricut has many fonts with a Writing style. But not all of them are true single stroke. A large share still draw as open, outlined shapes even with Writing on. So preview your actual words on the canvas before you trust a font, and do not assume "has a Writing style" means "writes as one line."
Where to get a font that truly writes:
- Ready-made: download from our free single line fonts, where every handwriting font comes with a real single-line weight, free with no account. Preview any of them with your own words first.
- Convert one you love: upload any OTF or TTF to the font to single line converter and get back a version that writes, with the original spacing kept.
- Your own handwriting: draw your alphabet once in the handwriting font generator and your Cricut writes like you from then on.
The full Design Space walkthrough for these fonts, including the System-font filter and the welding trick for script, is in How to use single line fonts in Cricut Design Space.
Why installed single-line fonts look faint on screen
If you install a single-line font and it looks thin and ghostly in the preview, that is normal, not broken. Standard TrueType and OpenType formats describe filled outlines, so a real centerline weight has to be built by tracing the skeleton of each letter, one path down the middle. The idea traces back to the Hershey fonts, public-domain stroke fonts Dr. Allen V. Hershey drew in 1967 for early vector plotters. On screen a single stroke has no fill to show, so it reads faint. The pen draws exactly that stroke, and it comes out clean. Conversion quality does vary by source font, cleaner for monoline and script, rougher for high-contrast serifs, which is covered honestly in fonts that write, not cut.
Write and cut in the same project
You do not have to choose between writing and cutting. You can do both on one mat:
- Set your text Operation to Pen / Draw.
- Set your shape (the card, tag, or label) to Cut.
- Select both and click Attach so they stay aligned.
- Click Make It.
The machine draws first with the pen, then pauses and prompts you to swap the pen for the blade, then cuts the shape, all without unloading the mat. It is the cleanest way to make a written-and-cut gift tag or place card in one pass.
Project ideas that land
- Envelopes. Addressed in single-line writing, they look hand-penned. For a whole guest list at once, the envelope addressing tool turns a spreadsheet into ready-to-write envelopes, and there is a dedicated flow for wedding envelope addressing.
- Cards and invitations. Write the sentiment inside before assembling; flat cardstock feeds most reliably.
- Gift tags and place cards. Small, fast, and the personal touch is the whole point. Use the write-then-cut trick above.
- Journals and planners. Headers and dividers in your own font look intentional in a way stickers never do.
Tips for clean writing
- Test on scrap first. Thirty seconds of testing saves a nice envelope.
- Seat the pen fully. Push it into the clamp until it clicks; a half-seated pen writes faint or skips.
- Tape thin material. Tissue-thin paper can shift under the rollers; a bit of tape at the edges holds it flat.
- Match tip to text size. A 0.4 fine point for addresses and small text, a 1.0 marker for big headlines or filling.
- Let ink dry before stacking. Gel and marker inks especially. Ten patient seconds beats a smudge.
- Darken glossy stock with a second pass. Shiny surfaces take ink less eagerly; duplicate the text on top of itself for an identical second pass.
- Store pens cap-down or flat. It keeps ink in the tip so the next project starts dark.
Troubleshooting
Most pen problems come down to four causes. Match your symptom and fix it fast.
| Symptom | Cause | Fix |
|---|---|---|
| Hollow or bubble letters | Outline font, or Style not set to Writing | Use a true single-line font; set Style to Writing for Cricut fonts |
| Doubled thin outline | A thin outline font traced on both edges | Switch to a real single-stroke font, not just any Writing font |
| Text moved on the mat | Forgot to Attach | Select the text and shape, click Attach, remake |
| Faint or skipping lines | Pen not clicked in, or a dry tip | Reseat until it clicks; uncap and scribble on scrap to restart ink flow |
| "Pen incompatible" or no color | No pen color chosen, or wrong pen family | Pick a pen color in the Operation menu; confirm the pen matches your machine |
If letters fill better but still look a touch thin, some crafters apply a small negative Offset (start around -0.02 to -0.03 inches and adjust) to pull a second line just inside the outline. It is a fill hack, not a true single stroke, and it can look scribbled at small sizes, so treat it as a last resort rather than the plan.
Beyond pens: a quick word on foil
The Draw menu is not only pens. If you want metallic lines, two tools do it. Cricut's own Foil Transfer Tool is pressure-activated (no heat), rides in Clamp B, uses a fine, medium, or bold tip, and burnishes Cricut foil sheets. The We R Memory Keepers Foil Quill is a heated tip that plugs into power and burns foil onto the page; Cricut has said using the Foil Quill can void the machine warranty. Both draw beautifully with single-line art, so pick your fonts the same way you would for a pen. See best fonts for foil quill and the foil quill fonts collection.
Frequently asked questions
Why is my Cricut drawing hollow or bubble letters instead of writing?
A normal font is a filled outline with no center, so the pen traces around each letter and leaves the middle empty. Switch to a true single-line writing font, and for a Cricut-brand font also set the Style dropdown to Writing, not just the Operation to Pen. If you are stuck, this rescue guide walks through it.
Which Cricut machines can write with a pen?
The Explore, Maker, Joy, Joy Xtra, and Venture families all hold pens. On Explore, Maker, and Venture the pen goes in Clamp A and clicks in; Joy and Joy Xtra use their single clamp, where the pen simply seats. Just match the pen label to your machine so it fits properly.
Do I have to use genuine Cricut pens?
No. Cricut pens are the easy plug-and-click option, but a third-party pen adapter lets you clamp a Sharpie, Pilot, gel, or Micron pen. Know that non-Cricut accessories can void the warranty and off-brand pens vary in line quality, so test on scrap first.
Can I use a Sharpie in my Cricut?
Yes, with a third-party pen adapter that holds the Sharpie at the right height. Test on scrap first, since marker ink bleeds more than a fine-point Cricut pen and heavier tips can smudge until they dry.
What Cricut pen tip size should I use?
Use a 0.4 mm fine point (or 0.3 mm extra fine) for envelope addresses and small text, and a 1.0 mm marker for large headlines or filling. Match the tip to the text size so lines look crisp, not blobby.
Can my Cricut write and cut in the same project?
Yes. Set the text to Pen / Draw and the shape to Cut, Attach them, then Make It. The machine draws first, pauses for you to swap in the blade, then cuts, all on one mat without unloading.
Why is my Cricut pen writing faintly or not at all?
Usually the pen is not fully seated, so push it in until it clicks. If it is still faint, uncap and scribble on scrap to restart the ink flow, confirm it is a compatible pen for your machine, and store pens cap-down so the tip stays inked.
From here, it is just typing
Once you have a font you love installed, every future writing project is just typing your words, checking Operation and Style, and pressing Go. The machine does the rest, and it never gets tired of writing your favorite phrase one more time.
Try it while you're here
Your words in real fonts made from real handwriting with this tool.
Loading fonts…
Make your Cricut pen write cleanly with a true single line font.
Get single line fonts for CricutFree to try, no account needed. Pay only when you keep a font.